Does a TDS Meter Measure Salinity? A TDS (Total Dissolved Solids) meter is a common tool used to measure the concentration of dissolved substances in water. But does it accurately measure salinity? The answer is both yes and no, depending on how salinity is defined and the specific application. Understanding TDS and SalinityTDS meters measure the total amount of dissolved inorganic and organic substances in water, including minerals, salts, and metals. They work by measuring the electrical conductivity (EC) of water and converting it into a TDS value, usually expressed in parts per million (ppm) or milligrams per litre (mg/L). Salinity, on the other hand, refers specifically to the concentration of dissolved salts in water, typically expressed in practical salinity units (PSU) or grams per litre (g/L). While salts contribute to TDS, TDS also includes other dissolved substances that do not contribute to salinity, such as organic compounds and minerals. Can a TDS Meter Accurately Measure Salinity?Since TDS meters estimate dissolved solids using EC, they provide an indirect measurement of salinity. However, the conversion from EC to TDS varies depending on the composition of the dissolved solids. Standard conversion factors range from 0.5 to 0.7, meaning that different types of water (e.g., freshwater vs. seawater) can yield different results. For precise salinity measurements, oceanographers and scientists use more specialized instruments, such as salinity meters or conductivity meters designed for marine applications. These devices are calibrated specifically to measure salt concentrations accurately. Using a Hanna TDS Meter for Salinity MeasurementHanna Instruments offers a range of high-quality TDS meters, such as the Hanna HI98301 models, which provide reliable and accurate measurements of total dissolved solids. While these meters are excellent for monitoring water quality in drinking water, hydroponics, and aquariums, they provide only an approximation of salinity. For those requiring precise salinity measurements, Hanna’s salinity meters, such as the HI98319 Marine Salinity Tester, are specifically designed to measure salt concentration accurately in seawater and brackish water applications. These meters use EC-based measurements but apply salinity-specific conversion factors to ensure accurate readings. Our Solution: The Hanna HI5522: A Comprehensive Solution For users needing a highly versatile water quality instrument, the Hanna HI5522 is an advanced laboratory-grade meter that measures pH, mV, ISE, EC, TDS, salinity, and resistivity. Unlike standard TDS meters, the HI5522 offers highly accurate salinity measurements using precise EC-based calculations. This makes it an ideal choice for research laboratories, water treatment facilities, and environmental monitoring where multiple water quality parameters must be measured with precision. When to Use a Hanna TDS Meter for Salinity Measurement A Hanna TDS meter can provide a rough estimate of salinity in freshwater sources such as drinking water, aquariums, and hydroponics. If the primary concern is monitoring general water quality, a TDS meter can be useful. However, for applications requiring accurate salinity measurements, such as oceanographic research, a dedicated high-precision device like the Hanna HI5522 is recommended. Related posts Benefits of Portable Multiparameter Devices for Water Quality Testing and Their Environmental Impact Benefits of Portable Multiparameter Devices for Water Quality Testing and Their Environmental Impact Water quality is a critical aspect of… Read more Transforming effluent into sustainability: Protecting communities and preserving the environment Transforming effluent into sustainability: Protecting communities and preserving the environment Wastewater treatment plays a pivotal role in preserving the environment… Read more How to Test Electrical Conductivity (EC) in Soil: The Complete Guide How to Test Electrical Conductivity (EC) in Soil: The Complete Guide Plants need plenty of sun, air, water, and nutrients… Read more Subscribe to our newsletter
Common Mistakes in pH Testing Common Mistakes in pH Testing and How to Avoid Them with Hanna Instruments pH Testers Accurate pH measurement is crucial across various industries, including agriculture, food and beverage production, water treatment, and labs. However, common mistakes in pH testing can lead to incorrect readings, affecting processes and product quality. Understanding these mistakes and using high-quality instruments, such as Hanna Instruments’ precision pH testers, electrodes and solutions, can help ensure reliable results. Using a Dry ElectrodeOne of the most frequent mistakes is allowing the pH electrode to dry out. A dry electrode leads to slow response times and inaccurate readings. pH electrodes should always be stored in a proper storage solution, such as Hanna Instruments’ HI70300L Electrode Storage Solution, to maintain the hydration layer necessary for accurate measurement.Solution: Always store the electrode in a recommended storage solution, not distilled or deionized water, which can degrade the sensing glass. Use Hanna Instruments’ refillable electrodes for extended lifespan and reliability. Not Calibrating RegularlySkipping calibration or calibrating infrequently results in inaccurate measurements. Even high-quality pH testers, like Hanna’s HI98161 professional waterproof pH meter, require regular calibration to maintain accuracy.Solution: Calibrate before each use or at least daily in frequent-use applications. Use fresh, high-quality calibration buffers, such as Hanna’s pH 4.01, 7.01, and 10.01 solutions. Ensure calibration points match the expected pH range of your sample. Using Expired or Contaminated Calibration BuffersOld or contaminated calibration buffers can lead to improper calibration, affecting measurement accuracy. Contamination can occur if the buffer solution is reused or exposed to environmental contaminants.Solution: Always check the expiration date on buffer solutions. Use fresh solutions and avoid dipping the electrode directly into the bottle. Hanna Instruments offers single-use sachets of calibration buffers to prevent contamination. Measuring pH in the Wrong Temperature ConditionspH electrodes are sensitive to temperature changes, and incorrect compensation can lead to errors. Hanna Instruments’ pH testers, like the HI9813-61, come with automatic temperature compensation (ATC) to correct for these variations.Solution: Use a pH tester with ATC to ensure precise readings. If using a manual compensation device, adjust the pH reading according to the temperature. Improper Cleaning of ElectrodesResidual sample buildup on the electrode can interfere with readings, especially in applications with proteins, oils, or heavy contaminants. Cleaning with water alone is insufficient. Solution: Use a proper cleaning solution like Hanna Instruments’ HI7061L General Purpose Electrode Cleaning Solution. Rinse the electrode with distilled water after each use. Perform deep cleaning regularly, depending on the application. Not Allowing the Electrode to StabilizeA rushed measurement can result in fluctuating readings, leading to incorrect data recording.Solution: Allow the electrode to stabilize before recording the final reading. High-quality testers from Hanna Instruments provide fast and stable readings, reducing waiting time. Using the Wrong pH Electrode for the ApplicationDifferent applications require specific electrode types. Using an unsuitable electrode can shorten its lifespan and reduce accuracy. Solution: Choose the right electrode for your application. For example: HI1131B: General-purpose glass electrode. FC2023: Food-grade electrode for dairy products. Consult Hanna Instruments for the best electrode choice for your needs. Avoiding these common mistakes ensures accurate and reliable pH measurements. Hanna Instruments’ precision pH testers and electrodes are designed to provide high performance and ease of use in various applications. By following proper handling, storage, and calibration practices, you can maximize the lifespan of your pH instruments and achieve precise results every time. Related posts How to Clean a pH Meter Probe How to Clean a pH Meter Probe Maintaining the accuracy and longevity of your pH meter probe is crucial for… Read more How to Use a pH Meter for Water Testing How to Use a pH Meter for Water Testing Maintaining the right pH level in water is crucial for various… Read more How to Test pH in Soil: The Complete Guide How to Test pH in Soil: The Complete Guide Ever wonder what else you can do to help your plants… Read more Subscribe to our newsletter

How to Test Soil Electrical Conductivity (EC) Using Hanna Soil Testers Soil electrical conductivity (EC) is a critical measurement for understanding soil health, fertility, and salinity levels. EC testing helps gardeners, farmers, and soil scientists optimize plant growth by ensuring that soil contains the right balance of nutrients. Hanna Instruments offers a range of soil testers that make measuring soil EC accurate and convenient. Here’s a comprehensive guide on how to test soil EC using Hanna soil testers. Why Measure Soil EC? Soil EC measures the ability of soil to conduct electrical current, which is directly related to the concentration of soluble salts. High EC levels may indicate excessive salinity, which can hinder plant growth, while low EC levels may suggest nutrient deficiencies. Regular testing helps: Monitor nutrient levels. Manage irrigation effectively. Prevent salinity-related plant stress. Optimize fertilizer applications. Tools You’ll Need Hanna waterproof soil EC tester (e.g., GroLine Hydroponic Waterproof Pocket pH/EC/TDS/Temperature Tester – HI98131) Distilled or deionized water (e.g., Deionized Water (3.7L) – HI70436) A clean container or beaker (e.g., Plastic Beaker – 170 mL: 6 piece set – HI740224) A soil sample Gloves (optional for handling soil) Step-by-Step Guide to Testing Soil EC 1. Prepare the Soil Sample Collect a representative soil sample from the area you want to test. Dig about 6 inches deep to gather soil where roots typically grow. Remove debris like rocks and plant material. Mix the soil thoroughly to ensure a uniform sample. 2. Create a Soil Slurry Add a 1:2 ratio of soil to distilled water in a clean container. For example, mix 1 part soil with 2 parts water. Stir the mixture thoroughly and let it sit for about 10 minutes to allow the soluble salts to dissolve into the water. 3. Calibrate the Hanna EC Tester Before testing, ensure the Hanna soil EC tester is properly calibrated. Follow the manufacturer’s instructions for calibration using the provided EC calibration solution (e.g., Quick Calibration Solution for GroLine pH & EC Meters – HI50036P). Rinse the probe with distilled water to remove any residues. 4. Measure the EC Insert the probe of the Hanna EC tester into the soil slurry. Make sure the probe is fully immersed in the liquid portion of the mixture. Wait for the reading to stabilize. Hanna EC testers typically provide fast, accurate results. 5. Record and Interpret the Results Record the EC value displayed on the meter. EC is usually measured in microsiemens per centimeter (µS/cm) or millisiemens per centimeter (mS/cm). Compare the results with recommended EC levels for your specific crops or soil type. For example: EC < 200 µS/cm: Low salinity, potential nutrient deficiency. EC 200-800 µS/cm: Ideal range for most crops. EC > 800 µS/cm: High salinity, potential plant stress. 6. Clean and Store the Tester After testing, rinse the probe with distilled water to remove soil particles. Dry the probe gently with a soft cloth. Store the EC tester as per the manufacturer’s guidelines to maintain accuracy Best Practices for Great Results Keep the electrode hydrated Why: Drying out the electrode leads to drifting pH values, slow response times, and incorrect measurements. Fix: “Revive” a dry electrode by submerging the bulb and junction in pH storage solution for at least one hour. Rinse, do not wipe your electrode Why: Wiping the pH glass can produce a static charge which interferes with the pH reading of the electrode. Fix: Simply rinse the electrode with distilled or deionized water (DI). Blot (do not rub) with a lint-free paper towel (e.g. Kimwipes®) to remove excess moisture. Store your electrode in storage solution Why: Storing in deionized water (DI) causes ions to leach from the glass membrane and reference electrolyte resulting in a slow and sluggish response. Fix: Store your electrode in storage solution. Clean your electrode regularly Why: Deposits can form on the electrode during use, coating the sensing glass. This can lead to erroneous calibrations and readings. Fix: Clean the electrode using a specially formulated cleaning solution for pH electrodes- ideally one that’s developed for your application. Calibrate often Why: All pH electrodes need to be calibrated often for best accuracy. Fix: The frequency of calibration depends on how accurate you want to be – daily calibration is ideal. Related posts How to Clean a pH Meter Probe How to Clean a pH Meter Probe Maintaining the accuracy and longevity of your pH meter probe is crucial for… Read more Using the Hanna Backpack Lab Soil Quality Educational Test Kit in Teaching Environmental Science Using the Hanna Backpack Lab Soil Quality Educational Test Kit in Teaching Environmental Science The importance of soil in our… Read more How to Test pH in Soil: The Complete Guide How to Test pH in Soil: The Complete Guide Ever wonder what else you can do to help your plants… Read more Subscribe to our newsletter
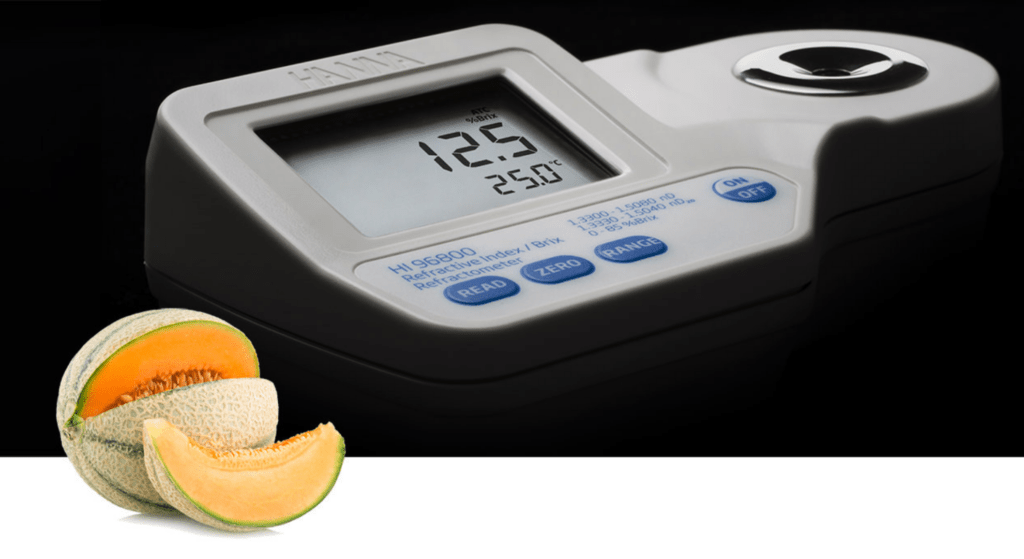
Understanding How Digital Refractometers Work Digital refractometers are essential tools in various industries, from food and beverage to pharmaceuticals and environmental science. They provide quick, accurate measurements of the refractive index of a substance, which can indicate its purity, concentration, or identity. In this article, we discuss about the principles behind their operation and how they make measuring refractive indices more accessible and reliable. The Principle of Refraction To understand how a digital refractometer works, it is important to understand the concept of refraction. Refractive index is defined as the ratio of the speed of light in a vacuum to the speed of light in a substance. A result of this property is that light will “bend,” or change direction, when it travels through a substance with a different refractive index. This is called refraction. The refractive index (RI) is a measure of how much the light bends. The refractive index measurements are usually reported at a reference temperature of 20°C (68°F), which is considered to be room temperature. How Digital Refractometers Work A digital refractometer uses an LED to pass light through a prism in contact with the sample. An image sensor determines the critical angle at which the light is no longer refracted through the sample. Specialized algorithms then apply temperature compensation to the measurement and convert the refractive index to the specified parameter. Here are the main components and steps involved: Light Source: The device uses a light-emitting diode (LED) or similar light source to project a beam of light onto the sample. Sample Prism: The sample is placed on a glass prism. The prism is typically made of a material with a known high refractive index. Critical Angle and Total Internal Reflection: When light passes through the sample and hits the prism at certain angles, total internal reflection occurs. The critical angle of this reflection depends on the refractive index of the sample. Detector: The light reflected at the critical angle is captured by a high-resolution detector, often a charge-coupled device (CCD) sensor. Electronic Processing: The refractometer’s microprocessor analyzes the detected light patterns to calculate the refractive index. Advanced models can also compensate for temperature variations, as temperature significantly affects refractive index readings. Display Output: The calculated refractive index, along with other related metrics like Brix (sugar concentration), is displayed digitally. Advantages of Digital Refractometers Digital refractometers offer several benefits over traditional analog devices: Precision: They provide more accurate and repeatable results. Ease of Use: Measurements are quick and require minimal sample preparation. Place a few drops of the sample in the well and press the READ key. Temperature Compensation: Automatic Temperature Compensation (ATC) for exceptionally accurate measurements. Versatility: They can measure a wide range of substances, including liquids, gels, and some solids. Portability: Compact models are available for fieldwork, making them versatile tools for on-the-go applications. Small sample size: Sample size can be as small as 2 metric drops. Single-point calibration: Calibrate with distilled or deionized water. Applications of Digital RefractometersDigital refractometers find applications in diverse fields: Food and Beverage: Measuring sugar concentration in juices, wines, and soft drinks. Pharmaceuticals: Ensuring the correct formulation of solutions. Chemical Industry: Determining concentrations of solutions. Environmental Science: Testing water quality by measuring salinity or dissolved solids. Maintenance and CalibrationTo ensure consistent performance, digital refractometers require regular cleaning, calibration, and maintenance. Most devices come with calibration solutions, often distilled or deionized water. Proper handling and storage can significantly extend the device’s lifespan. ConclusionDigital refractometers help the measurement of refractive indices more accurate, and accessible across various industries. Whether in a lab, factory, or field, these devices continue to be key tools for quality control and research. Our Solution: Hanna Digital Refractometers are rugged, portable, water-resistant devices that eliminates the uncertainty associated with mechanical refractometers. 1. Easy measurement 2. Quick, accurate results 3. IP65 water protection 4. Small sample size 5. ABS thermoplastic casing 6 When powered on, the meter displays battery life and the set measurement units 7. Unit selection 8. Automatic Temperature Compensation 9. Single-point calibration 10. BEPS (Battery Error Prevention System) 11. Automatic shut-off after three minutes of non-use Related posts How to Clean a pH Meter Probe How to Clean a pH Meter Probe Maintaining the accuracy and longevity of your pH meter probe is crucial for… Read more Measuring pH in Acidified Foods Measuring pH in Acidified Foods Find out all you need to know about measuring pH in acidified foods. To succeed… Read more Titration Guide Book Importance of checking water parameters in wastewater Water parameters in wastewater play a crucial role in ensuring environmental sustainability, community… Read more Subscribe to our newsletter
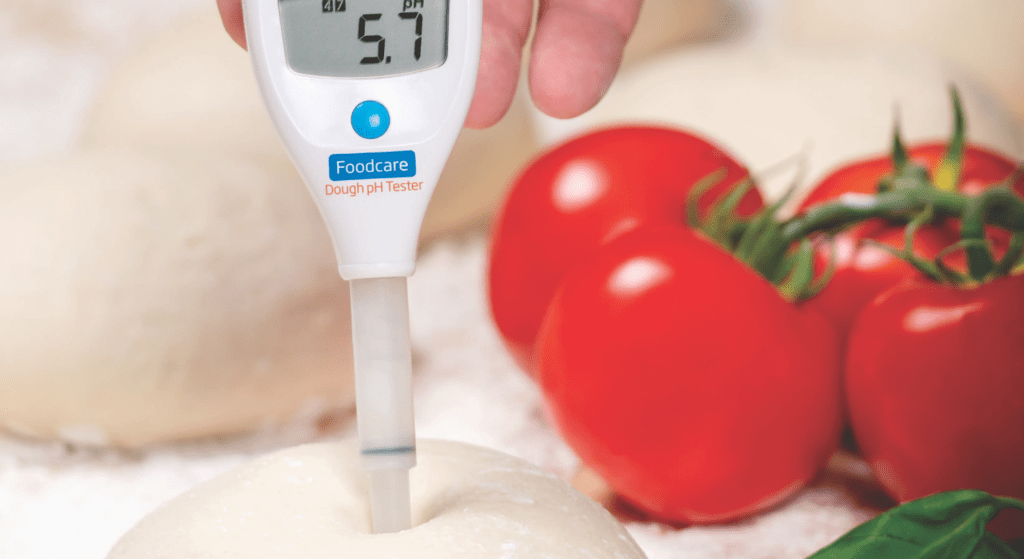
Enhancing Bread Shelf Life by Measuring the pH of Bread Dough Bread is a staple in the diet of most people. It has been made and enjoyed since ancient times. From the loaf of bread to flat bread to white bread to sourdough, it can be found in every corner of the world. For the bakery that produces processed bread that is purchased in the store, it is important to add preservatives that extend the shelf life of the product. The preservatives are used to inhibit the growth of mold and bacteria. By extending the shelf life, the bakery can sell more product and thus increase their profitability. For Hanna Instruments, adding preservatives is important because that they have in lowering pH. The pH of dough is measured to ensure that the pH is low enough to inhibit the growth. Common preservatives added to dough include benzoic acid, tartaric acid and calcium propionate. There are several methods to measure the pH of dough, but one of the simplest and most effective is to create a slurry by mixing a portion of dough with deionized water. However, directly inserting a pH meter into the dough is not recommended. As shown in the image on the right, this approach can cause significant issues, such as clogging the electrode junction and making it difficult to clean the dough residue from around the glass electrode. Proper technique is essential to ensure accurate readings and maintain the longevity of the pH meter. Our Solution: A tortilla manufacturer was looking to measure the pH of the dough before baking. The recommended solution was the HI99161 (Portable Food and Dairy pH Meter) that is supplied with the FC202D pH electrode with built-in temperature sensor. What makes this the ideal solution is the design of the pH electrode. The FC202D has a spear tip electrode for easy penetration into the dough and is completely exposed for easy cleaning. The FC202D also utilizes an open junction design with a viscolene based electrolyte. The open junction design is virtually impossible to clog since any deposits can be easily removed, exposing the reference cell. Lastly, the PVDF body is a food grade plastic that conforms to specifications and requirements for the food processing industry. As with many applications, it is always important to recommend cleaning solution. With this application, the HI70641L cleaning and disinfection solution for dairy products would compliment the HI99161. Related posts How to Clean a pH Meter Probe How to Clean a pH Meter Probe Maintaining the accuracy and longevity of your pH meter probe is crucial for… Read more Measuring pH in Acidified Foods Measuring pH in Acidified Foods Find out all you need to know about measuring pH in acidified foods. To succeed… Read more Titration Guide Book Importance of checking water parameters in wastewater Water parameters in wastewater play a crucial role in ensuring environmental sustainability, community… Read more Subscribe to our newsletter

Growing in Spring: Data vs. Tradition with a Focus on Soil Testing As technology advances, the world of agriculture is undergoing a transformation, especially during spring planting. The shift from traditional, experience based methods to modern, data driven strategies has brought new tools that farmers can use to optimize their yields. One key area where this is evident is soil testing, which is critical for understanding soil health and fertility. The question arises: how does data-driven soil testing compare with institutional or traditional wisdom when it comes to planting? The Importance of Spring PlantingSpring is the most critical time for farmers as they prepare to plant their crops. As temperatures rise and days grow longer, the natural growing cycle begins again. Historically, farmers relied on intuition and traditional practices passed down through generations to make decisions about when and how to plant. This institutional knowledge involved recognizing changes in weather patterns, and understanding which crops perform best in certain conditions.But in the age of big data and advanced technology, more farmers are turning to soil testing and other scientific tools to ensure the health of their fields. Data-driven approaches provide new ways to assess soil conditions, manage nutrients, and improve crop performance. The Role of Soil Testing in Modern Agriculture1. Understanding Soil Composition and Health: Soil testing is a cornerstone of modern farming. Traditional methods of gauging soil quality often involved observing plant health or relying on general knowledge of the land. However, these methods can be imprecise and sometimes lead to overuse or underuse of fertilizers and other inputs.Soil test kits allow farmers to measure critical factors like soil pH, nutrient levels, and organic matter content. This data helps farmers understand the specific needs of their fields. For instance, crops thrive best in a pH range that is optimal for their nutrient uptake. Testing soil pH before planting allows farmers to adjust the soil if necessary, ensuring better nutrient availability for their crops. Without this critical step, even high-quality fertilizers and careful planting schedules may not lead to the best yields. 2. Nutrient Management: One of the most valuable aspects of soil testing is the ability to manage nutrients more precisely. A soil test can reveal deficiencies or excesses of nutrients like nitrogen (N), phosphorus (P), and potassium (K), which are essential for crop growth. Based on this information, farmers can apply fertilizers in the exact quantities needed for each part of their field.In contrast, traditional methods of fertilization often involve applying a standard amount of fertilizer across a field, which may lead to over-fertilization in some areas and under-fertilization in others. This imbalance can lead to poor crop performance, wasted resources, and environmental issues such as nutrient runoff into nearby water bodies. Precision nutrient management based on soil data not only improves yields but also reduces environmental impacts. 3. Soil pH Testing: Soil pH is one of the most important factors that affect crop growth. Different crops have specific pH ranges in which they thrive, and soil that is too acidic or too alkaline can inhibit nutrient absorption. Regular soil pH testing allows farmers to adjust the pH level by adding lime to raise acidity or sulfur to lower it. Correcting pH imbalances ensures that crops can access the nutrients they need during the growing season.Traditionally, farmers would estimate soil pH based on the types of plants growing in the area, or they would only test sporadically. But modern soil pH test kits make it easier for farmers to get real-time data, enabling them to make more accurate adjustments. The Role of Tradition and Institutional Knowledge in Soil Management While soil testing and data-driven tools are transforming spring planting, traditional knowledge still plays an important role. Many farmers have developed a deep understanding of their land over the years, and this experience can complement data-based approaches. 1. Local Knowledge of Soil Conditions: In some cases, traditional practices are closely tied to the specific local conditions of the land. For example, farmers may know from experience that certain areas of their field drain poorly or have particularly fertile soil. While data can offer detailed insights, these traditional observations remain valuable for day-to-day decision-making. 2. Long-Term Soil Health Management: Traditional farming practices often include long-term strategies for preserving soil health, such as crop rotation, cover cropping, and maintaining organic matter in the soil. These techniques help maintain the fertility of the soil and prevent erosion. Modern soil testing can enhance these practices by providing data that supports traditional methods, ensuring that farmers are making decisions that will benefit their fields over the long term. Blending Data and Tradition for the Best Spring Planting ResultsThe best results often come from a combination of data-driven tools and traditional farming wisdom. Soil testing provides critical information about soil health, pH levels, and nutrient availability, allowing farmers to make precise adjustments to their fields. Meanwhile, traditional knowledge provides a deeper understanding of local conditions and long-term trends that data alone may not capture.For instance, a soil test may indicate that the pH of a field is slightly too low for a particular crop. Using traditional knowledge, a farmer might also know that the region’s weather typically fluctuates in late spring, potentially affecting soil acidity. Combining this institutional knowledge with the soil data allows for a more strategic approach, ensuring that planting decisions are as informed and effective as possible. Our soil testing products: Hanna Instruments GroLine Soil Testing Products offer a reliable and user-friendly solution for farmers, gardeners, and researchers to accurately measure soil health. Designed specifically for the agricultural industry, GroLine products help monitor essential parameters such as soil pH, conductivity, and nutrient levels. With advanced digital meters, portable kits, and high-precision sensors, these tools provide real-time data that enable users to make informed decisions for optimizing soil conditions and boosting plant growth. Whether you’re managing crops, greenhouse plants, or home gardens, GroLine soil testing products deliver accurate results to help maximize productivity and sustainability. Related posts Using the Hanna Backpack Lab

The Ultimate Guide to Pool Water Testing Discover the key pool water parameters every pool owner should test for. One of the most important aspects of pool maintenance is regular water testing. Ensuring your pool water is balanced and safe not only keeps the water clear and sparkling but also prevents potential health risks and equipment damage. Why is Pool Water Testing Important?Testing your pool water regularly is crucial for several reasons: Safety and Health: Properly balanced pool water protects swimmers from various health issues. Incorrect levels of chemicals, especially chlorine, can also irritate the skin, eyes, and respiratory system. Water Clarity and Comfort: Balanced pool water helps maintain crystal-clear water and ensures a comfortable swimming environment. Imbalances can lead to cloudy water, unpleasant odours, and scaling or corrosion of pool equipment. Chemical Efficiency: Maintaining the correct chemical balance ensures that sanitizers like chlorine or bromine work effectively. This helps to maximize the efficacy of your pool chemicals and reduce the amount you need to use. Equipment Longevity: Improperly balanced water can cause damage to pool equipment such as pumps, filters, heaters, and even the pool liner or surface. Regular testing and balancing help extend the life of your pool equipment. Let’s go over what you need to monitor in your pool water and the testing equipment required to ensure your pool is ready for swimming. Key Parameters to Test:When testing pool water, there are several key parameters you should monitor regularly: 1. Chlorine Levels: Free Chlorine: This is the active form of chlorine in the pool that is available to kill bacteria and other harmful organisms. The ideal range for free chlorine is typically between 1.0 to 3.0 parts per million (ppm). Combined Chlorine: Also known as chloramines, these are compounds formed when free chlorine combines with contaminants in the water. High levels of combined chlorine can cause eye irritation and an unpleasant chlorine smell. The combined chlorine level should be less than 0.5 ppm. Our recommendation for chlorine test: Our Pool Digital Free Chlorine Checker® HC (HI7014) is just what every pool owner needs. Test kits can be tricky, and results are inconsistent. Achieve precise and consistent digital free chlorine results with our Checker. 2. pH, EC/TDS: pH measures the acidity of pool water and affects the effectiveness of chlorine as a sanitizer. If the pH is too low, the water becomes more acidic, which can make chlorine too harsh. If the pH is too high, chlorine becomes less effective, reducing its ability to kill bacteria and algae. Additionally, an improper pH level can cause skin and eye irritation for swimmers. What are the normal ranges for pH and EC/TDS? pH Range: 7.2 – 7.8 EC/TDS Range for Freshwater Pools: 500 – 2500 ppm EC/TDS Range for Saltwater Pools: 0 – 1500 ppm above salt level 3. Total Alkalinity: Total alkalinity measures the concentration of alkaline substances in the pool water and helps stabilize pH levels. The ideal range is between 80 to 120 ppm. If total alkalinity is too low, the pH can fluctuate wildly, leading to potential damage to pool surfaces and equipment. If too high, it can cause cloudy water and scaling. 4. Calcium Hardness Calcium hardness refers to the concentration of calcium in the pool water. The ideal range is between 200 to 400 ppm. Low calcium hardness can cause corrosion of pool surfaces and equipment, while high levels can lead to scaling and cloudy water. 5. Cyanuric Acid (Stabilizer): Cyanuric acid helps protect chlorine from being degraded by sunlight. For outdoor pools, the ideal range is between 30 to 50 ppm. If the level is too low, chlorine will be quickly depleted by UV rays. If too high, it can reduce chlorine’s effectiveness. 6. Temperature: Whether you enjoy a refreshing dip or a warm soak, the temperature of the pool is crucial in avoiding discomfort and potential health risks. Various factors, such as weather conditions, sunlight exposure, and pool heating systems, can affect the temperature of the water. Water that is too cold can lead to hypothermia, while excessively warm water can cause heat exhaustion or dehydration. It’s important for pool owners to regulate the water temperature to maintain both safety and comfort. What is a normal temperature range?Between 25 to 27 °C is ideal, however, temperatures can vary based on personal preferences How Often Should You Test Your Pool Water?The frequency of testing depends on several factors, including pool usage, weather conditions, and the type of chemicals used. However, a general guideline is as follows: Chlorine and pH: Test at least 2-3 times per week. Total Alkalinity and Calcium Hardness: Test once a week. Cyanuric Acid: Test once a month for outdoor pools. TDS and Other Tests: Test every 3-6 months or as needed, depending on your pool’s condition and usage. Our pool water testing products: The Pool Digital Combo pH/EC/TDS Tester (HI981304) is an excellent tool for maintaining saltwater pools. This all-in-one device allows you to conveniently measure three important parameters: pH, electrical conductivity (EC), and total dissolved solids (TDS), along with temperature. With its user-friendly design, you can easily get accurate readings, making pool maintenance simpler and more efficient. Choose our Pool Checktemp® Dip Digital Thermometer (HI985394) as your go-to device for accurate temperature measurements. This durable and easy-to-use thermometer provides quick and reliable readings, perfect for monitoring pool conditions. Designed with a long 3-meter (9.9-foot) cable, it allows you to reach deep into the pool water, enabling temperature measurement at various depths for comprehensive pool monitoring. Related posts How to Use a pH Meter for Water Testing How to Use a pH Meter for Water Testing Maintaining the right pH level in water is crucial for various… Read more Monitoring Water Quality – Disinfection Monitoring Water Quality – Disinfection Part 1. Disinfection Properties of water bodies vary based on natural factors such as landscape… Read more The Significance of Pool and Spa Water Testing The Significance of Pool and Spa Water Testing In swimming pool treatment, disinfection
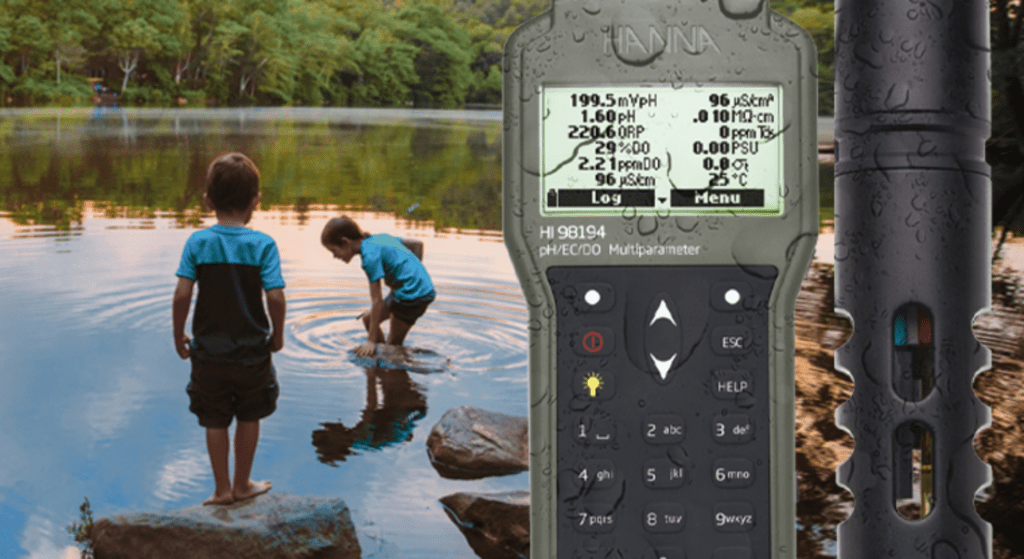
Benefits of Portable Multiparameter Devices for Water Quality Testing and Their Environmental Impact Water quality is a critical aspect of environmental health, public safety, and sustainability. The ability to accurately and efficiently measure water quality is essential for managing natural resources, protecting ecosystems, and ensuring safe drinking water. Portable water quality testing equipment plays a crucial role in ensuring the quality of the water, by helping field technicians to detect water parameters real time. These devices offer a range of benefits that make them indispensable for water quality monitoring and contribute significantly to sustainability efforts. Benefits of Portable Multiparameter Water Quality Testing Comprehensive data collection: Portable multiparameter devices can measure various water quality parameters simultaneously, including pH, ORP, EC/TDS, dissolved oxygen, turbidity, ammonium, chloride, nitrate, salinity, atmospheric pressure, temperature, and more. This comprehensive data collection allows for a thorough assessment of water quality, providing a more complete picture than single-parameter devices. Durable design for harsh environments: Rain or shine, portable water quality meters are strong and capable of testing in various types of weather and terrain. Field technicians need to be ready to test at any moment, whether in cold and stormy mountainous areas or highly humid conditions often found in wetlands and marshes. Portable water quality testing equipment makes on-the-spot analysis possible. Meters are built with tough, rugged components, and most are constructed with waterproof casings that can stand up to the knocks and drops that can occur while testing. Hanna Instruments’ portable multiparameter device comes in a hard casing, making it easy to carry and securely store probes and electrodes. Real-time monitoring: One of the most significant advantages of portable multiparameter devices is their ability to provide real-time data. Immediate feedback on water quality conditions enables quick decision-making and timely interventions. This is particularly crucial in situations where water quality can change rapidly, such as during industrial discharge events or algal blooms. Ease of Use, Accessibility and Mobility: Portable multiparameter devices are designed to be user-friendly, with intuitive interfaces and robust construction that withstands field conditions. This ease of use makes them accessible to a broad range of users, from trained scientists to field technicians. These meters are versatile and can be conveniently carried to various locations, including remote areas, making it easier to test anywhere and obtain immediate results without delays. Cost-Effectiveness: By consolidating multiple testing capabilities into a single device, portable multiparameter testers reduce the need for multiple instruments and associated costs. This cost-effectiveness extends to reduced maintenance and calibration expenses, as fewer devices mean less equipment to service. Enhanced Environmental Protection: Accurate and timely water quality data are crucial for detecting pollution events and monitoring the health of aquatic ecosystems. Portable multiparameter devices help monitor the parameters that impact water quality, aiding in the protection of biodiversity and environmental sustainability. Support for Regulatory Compliance: Accurate and timely water quality data are crucial for detecting pollution events and monitoring the health of aquatic ecosystems. Businesses that monitor water quality to stay in compliance with regulations also depend on this data. Regulatory agencies rely on precise water quality data to enforce environmental laws and standards. Portable multiparameter devices provide the necessary data to ensure compliance with these regulations, helping to maintain safe and clean water for communities and ecosystems. Reducing Environmental Footprint: By enabling more efficient and effective monitoring, portable multiparameter devices can reduce the environmental footprint associated with water quality testing. Fewer trips to and from testing sites, combined with the reduction in equipment needed, contribute to lower carbon emissions and resource use. Start testing with our portable water quality meters We understand! Selecting a portable water quality meter that can meet the demands of field testing can seem overwhelming and daunting. Our collection of portable water quality meters are durable, reliable, and up for the task at hand. There are also various dedicated and multiparameter options to choose from, so finding the right fit for your testing needs is easier than ever. Be prepared to measure water quality parameters including pH, ORP, EC/TDS, dissolved oxygen, turbidity, temperature, and more on-site. Related posts How to Use a pH Meter for Water Testing How to Use a pH Meter for Water Testing Maintaining the right pH level in water is crucial for various… Read more Importance of checking water parameters in wastewater Importance of checking water parameters in wastewater Water parameters in wastewater play a crucial role in ensuring environmental sustainability, community… Read more The role of free chlorine in keeping drinking water safe The role of free chlorine in keeping drinking water safe Clean drinking water is essential to human urvival. To make… Read more Subscribe to our newsletter
How to Clean a pH Meter Probe Maintaining the accuracy and longevity of your pH meter probe is crucial for obtaining reliable measurements. Regular cleaning of the probe is essential as it can be contaminated by residues from the solutions it measures. Here is a comprehensive guide on how to properly clean a pH meter probe. Why Cleaning is ImportantThe pH meter probe, often called the electrode, is the most sensitive part of the pH meter. It can accumulate residues from the sample solutions, which can affect its accuracy and response time. Regular cleaning ensures that the electrode provides consistent and accurate readings, prolonging the life of the probe. Here are some steps you can take to keep your electrode clean. Materials Needed Distilled or deionized water pH electrode cleaning solution Beaker or container Application-specific cleaning solution (if needed) Mild detergent (optional) Storage solution (optional) Step-by-Step Cleaning Procedure 1. Rinse with Distilled Water: Start by rinsing the probe with distilled or deionized water to remove any loose particles. Hold the probe under a gentle stream of water or immerse it in a container filled with distilled water. 2. Soak in Cleaning Solution: Soak the electrode in a general cleaning solution or an appropriate use-specific cleaning solution for at least 15 minutes to dissolve contamination. Whenever possible, use a cleaning solution specifically designed for your application, as these are formulated to effectively remove the specific types of stains and deposits from your samples. For example, a cleaning solution for winemaking will effectively remove the deep stains left by red wine and must. Avoid using harsh chemicals or abrasive materials, as they can damage the sensitive glass membrane of the probe. Application specific cleaning: Protein Coating: Soak your electrode in the HI7073L Protein Cleaning Solution for at least 15 minutes to enzymatically dissolve protein deposits. Rinse the electrode with water. Allow it to rehydrate in HI70300L storage solution for at least one hour (overnight for best results). Inorganic Soak: Soak the electrode in HI7074L Inorganic Cleaning Solution for at least 15 minutes to remove precipitates caused by reactions with silver in the filling solution. Rinse the electrode with water. Allow it to rehydrate in HI70300L storage solution for at least one hour (overnight for best results). Oil and Grease: Soak the electrode in HI7077L Oil and Fat Cleaning Solution for at least 15 minutes to remove oil and grease residues without damaging the electrode. Rinse the electrode with water. Allow it to rehydrate in HI70300L storage solution for at least one hour (overnight for best results). 3. Rinse Thoroughly: After cleaning, rinse the pH electrode thoroughly with distilled or deionized (DI) water. Then, soak the electrode in a storage solution for at least 2-3 hours before calibration. For optimal results, we recommend soaking the electrode overnight. This step is crucial to prevent any residual cleaning agent from affecting future measurements. 4. Store the Probe: If you need to store the probe, ensure it is adequately moist according to the manufacturer’s recommendations, usually in a storage solution or buffer. Keep the electrode in a protective cap filled with storage solution. If your probe does not have a cap, use a small container that can hold the probe and enough storage solution to cover the glass bulb. After long-term storage, soak the electrode in storage solution for at least 2-3 hours before use. For best results, soak it overnight to ensure the glass membrane is fully hydrated. 5. Calibration: After cleaning, it’s essential to calibrate the pH meter to ensure accurate readings. Our calibration buffers are designed to have a long shelf life when left unopened. Once opened, a buffer with a pH lower than 7 will last around 4-8 weeks, while a buffer with a pH over 7 will be good for about 1-2 weeks. To prevent contamination of your calibration solutions, never submerge your electrode right into the bottle. Pour out just what is needed into a container that has been rinsed with DI water and use that for your calibration. Never pour used buffer back into the bottle! Read our article about how to calibrate your pH electrode. Maintaining a clean pH meter probe is essential for accurate and reliable measurements. By following these cleaning and maintenance steps, you can ensure the optimal performance of your pH meter. Related posts How to Use a pH Meter for Water Testing How to Use a pH Meter for Water Testing Maintaining the right pH level in water is crucial for various… Read more Calibrating your pH electrodes Calibrating your pH electrodes When it comes to pH measurement, precision is crucial. pH meters are indispensable tools in numerous… Read more What Type of pH Calibration Solution Should You Use? What Type of pH Calibration Solution Should You Use? pH calibration solutions, also called pH buffers, are an essential tool… Read more Subscribe to our newsletter

How to Use a pH Meter for Water Testing Maintaining the right pH level in water is crucial for various applications, including agriculture, aquariums, drinking water, and industrial processes. A pH meter is an essential tool for accurately measuring the pH level of water. Here’s a step-by-step guide on how to use a pH meter for water testing. What is a pH Meter? A pH meter is an electronic device used to measure the acidity or alkalinity of a solution. It consists of a probe and a digital display. The probe measures the hydrogen-ion activity in the solution, which the meter then translates into a pH reading. Hanna Instruments manufactures a wide range of pH meters designed for various applications, including portable, benchtop, and multiparameter waterproof pH meters. Step-by-Step Guide to Using a pH Meter 1. Calibrate the pH Meter: Calibration ensures that your pH meter provides accurate readings. It’s important to calibrate the meter regularly, especially before use. Here’s how: Prepare the Calibration Solutions: You will need standard buffer solutions, typically pH 4.0, pH 7.0, and pH 10.0. Turn on the Meter: Press the power button to turn on the pH meter. Rinse the Probe: Rinse the probe with distilled water and gently blot it dry with a lint-free tissue. Immerse the Probe in the pH 7.0 Buffer Solution: Allow the reading to stabilize and adjust the meter to read exactly 7.0. Rinse and Repeat for Other Buffers: Rinse the probe again and repeat the process with the pH 4.0 and pH 10.0 buffer solutions, adjusting the meter as necessary. To learn more, read our article on calibrating pH electrodes. 2. Prepare the Sample: Collect the Water Sample: Use a clean container to collect the water sample you intend to test. Let the Sample Reach Room Temperature: pH readings can be affected by temperature, so it’s best to let the sample reach room temperature for the most accurate measurement. 3. Measure the pH Rinse the Probe: Once again, rinse the probe with distilled water to avoid contamination. Immerse the Probe in the Sample: Place the probe into the water sample. Ensure the probe is fully submerged. Wait for the Reading to Stabilize: Allow a few seconds for the reading to stabilize. The digital display will show the pH level of the water sample. Record the pH Value: Note down the pH value for your records. 4. Clean and Store the Probe Rinse the Probe: After measuring, rinse the probe with distilled water. Store the Probe Properly: If the pH meter will not be used for a while, store the probe in a storage solution to keep it hydrated and ready for future use. Tips for Accurate pH Measurement Regular Calibration: Calibrate your pH meter regularly to maintain accuracy. Proper Storage: Always store the probe in the appropriate storage solution when not in use. Clean the Probe: Rinse the probe with distilled water before and after each use to prevent contamination. Avoid Extreme Temperatures: Extreme temperatures can affect the accuracy of pH measurements, so always test at room temperature. Maintenance tasks beyond cleaning, calibrating, and storage include: Replacing the Membrane: Change the membrane every 2 months, or when it does not read “0.0” in a zero-oxygen solution, or when measurements become unstable. Replacing the Electrolyte: Replace the electrolyte monthly. Tap the cap to ensure no air bubbles remain trapped and avoid touching the membrane. Polishing the Sensor: Whenever you change the membrane, polish the sensor. With the sensor facing down, unscrew the cap counterclockwise. If there are deposits on the sensor, gently brush the surface with the supplied brush, taking care not to damage the plastic body. Do not use the brush on the membrane. If the deposits cannot be removed by brushing, use the supplied abrasive pad to polish the sensor, achieving as much luster as possible for optimal performance. Using a pH meter for water testing is a straightforward process that can provide valuable insights into the quality and condition of your water. By following the steps outlined above and adhering to proper maintenance practices, you can ensure accurate and reliable pH readings. Discover our range of pH meters Order online Related posts Enhancing Bread Shelf Life by Measuring the pH of Bread Dough Enhancing Bread Shelf Life by Measuring the pH of Bread Dough Bread is a staple in the diet of most… Read more How to Clean a pH Meter Probe How to Clean a pH Meter Probe Maintaining the accuracy and longevity of your pH meter probe is crucial for… Read more How to Test pH in Soil: The Complete Guide How to Test pH in Soil: The Complete Guide Ever wonder what else you can do to help your plants… Read more Subscribe to our newsletter