
The Ultimate Guide to Pool Water Testing Discover the key pool water parameters every pool owner should test for. One of the most important aspects of pool maintenance is regular water testing. Ensuring your pool water is balanced and safe not only keeps the water clear and sparkling but also prevents potential health risks and equipment damage. Why is Pool Water Testing Important?Testing your pool water regularly is crucial for several reasons: Safety and Health: Properly balanced pool water protects swimmers from various health issues. Incorrect levels of chemicals, especially chlorine, can also irritate the skin, eyes, and respiratory system. Water Clarity and Comfort: Balanced pool water helps maintain crystal-clear water and ensures a comfortable swimming environment. Imbalances can lead to cloudy water, unpleasant odours, and scaling or corrosion of pool equipment. Chemical Efficiency: Maintaining the correct chemical balance ensures that sanitizers like chlorine or bromine work effectively. This helps to maximize the efficacy of your pool chemicals and reduce the amount you need to use. Equipment Longevity: Improperly balanced water can cause damage to pool equipment such as pumps, filters, heaters, and even the pool liner or surface. Regular testing and balancing help extend the life of your pool equipment. Let’s go over what you need to monitor in your pool water and the testing equipment required to ensure your pool is ready for swimming. Key Parameters to Test:When testing pool water, there are several key parameters you should monitor regularly: 1. Chlorine Levels: Free Chlorine: This is the active form of chlorine in the pool that is available to kill bacteria and other harmful organisms. The ideal range for free chlorine is typically between 1.0 to 3.0 parts per million (ppm). Combined Chlorine: Also known as chloramines, these are compounds formed when free chlorine combines with contaminants in the water. High levels of combined chlorine can cause eye irritation and an unpleasant chlorine smell. The combined chlorine level should be less than 0.5 ppm. Our recommendation for chlorine test: Our Pool Digital Free Chlorine Checker® HC (HI7014) is just what every pool owner needs. Test kits can be tricky, and results are inconsistent. Achieve precise and consistent digital free chlorine results with our Checker. 2. pH, EC/TDS: pH measures the acidity of pool water and affects the effectiveness of chlorine as a sanitizer. If the pH is too low, the water becomes more acidic, which can make chlorine too harsh. If the pH is too high, chlorine becomes less effective, reducing its ability to kill bacteria and algae. Additionally, an improper pH level can cause skin and eye irritation for swimmers. What are the normal ranges for pH and EC/TDS? pH Range: 7.2 – 7.8 EC/TDS Range for Freshwater Pools: 500 – 2500 ppm EC/TDS Range for Saltwater Pools: 0 – 1500 ppm above salt level 3. Total Alkalinity: Total alkalinity measures the concentration of alkaline substances in the pool water and helps stabilize pH levels. The ideal range is between 80 to 120 ppm. If total alkalinity is too low, the pH can fluctuate wildly, leading to potential damage to pool surfaces and equipment. If too high, it can cause cloudy water and scaling. 4. Calcium Hardness Calcium hardness refers to the concentration of calcium in the pool water. The ideal range is between 200 to 400 ppm. Low calcium hardness can cause corrosion of pool surfaces and equipment, while high levels can lead to scaling and cloudy water. 5. Cyanuric Acid (Stabilizer): Cyanuric acid helps protect chlorine from being degraded by sunlight. For outdoor pools, the ideal range is between 30 to 50 ppm. If the level is too low, chlorine will be quickly depleted by UV rays. If too high, it can reduce chlorine’s effectiveness. 6. Temperature: Whether you enjoy a refreshing dip or a warm soak, the temperature of the pool is crucial in avoiding discomfort and potential health risks. Various factors, such as weather conditions, sunlight exposure, and pool heating systems, can affect the temperature of the water. Water that is too cold can lead to hypothermia, while excessively warm water can cause heat exhaustion or dehydration. It’s important for pool owners to regulate the water temperature to maintain both safety and comfort. What is a normal temperature range?Between 25 to 27 °C is ideal, however, temperatures can vary based on personal preferences How Often Should You Test Your Pool Water?The frequency of testing depends on several factors, including pool usage, weather conditions, and the type of chemicals used. However, a general guideline is as follows: Chlorine and pH: Test at least 2-3 times per week. Total Alkalinity and Calcium Hardness: Test once a week. Cyanuric Acid: Test once a month for outdoor pools. TDS and Other Tests: Test every 3-6 months or as needed, depending on your pool’s condition and usage. Our pool water testing products: The Pool Digital Combo pH/EC/TDS Tester (HI981304) is an excellent tool for maintaining saltwater pools. This all-in-one device allows you to conveniently measure three important parameters: pH, electrical conductivity (EC), and total dissolved solids (TDS), along with temperature. With its user-friendly design, you can easily get accurate readings, making pool maintenance simpler and more efficient. Choose our Pool Checktemp® Dip Digital Thermometer (HI985394) as your go-to device for accurate temperature measurements. This durable and easy-to-use thermometer provides quick and reliable readings, perfect for monitoring pool conditions. Designed with a long 3-meter (9.9-foot) cable, it allows you to reach deep into the pool water, enabling temperature measurement at various depths for comprehensive pool monitoring. Related posts The Significance of Pool and Spa Water Testing The Significance of Pool and Spa Water Testing In swimming… Aquascaping: The Art and Science of Aquariums Aquascaping: The Art and Science of Aquariums The natural world… Load More Subscribe to our newsletter Latest offers, tips, news, industry insights and resources delivered to your inbox. Email: Name: Subscribe You have been successfully Subscribed! Ops! Something went wrong, please try again.
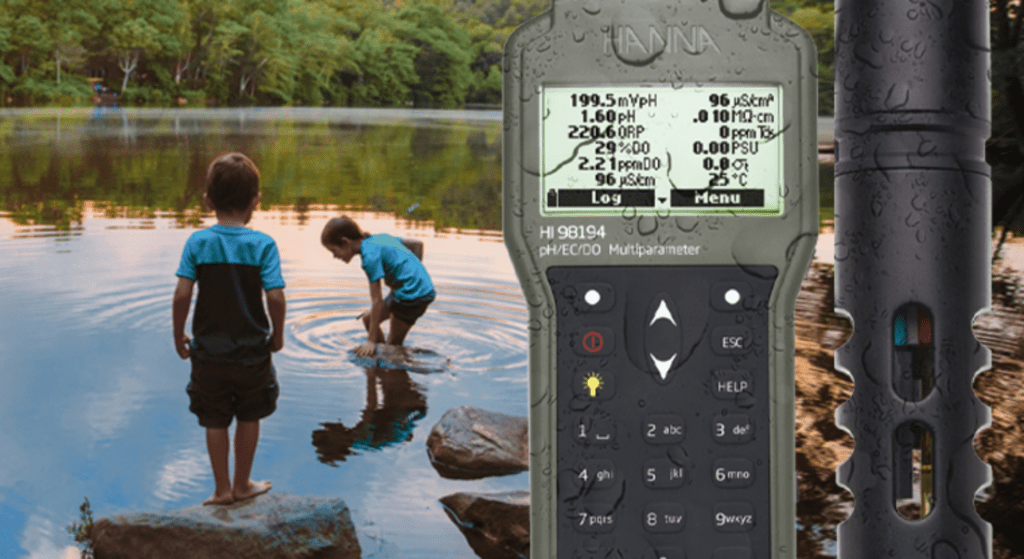
Benefits of Portable Multiparameter Devices for Water Quality Testing and Their Environmental Impact Water quality is a critical aspect of environmental health, public safety, and sustainability. The ability to accurately and efficiently measure water quality is essential for managing natural resources, protecting ecosystems, and ensuring safe drinking water. Portable water quality testing equipment plays a crucial role in ensuring the quality of the water, by helping field technicians to detect water parameters real time. These devices offer a range of benefits that make them indispensable for water quality monitoring and contribute significantly to sustainability efforts. Benefits of Portable Multiparameter Water Quality Testing Comprehensive data collection: Portable multiparameter devices can measure various water quality parameters simultaneously, including pH, ORP, EC/TDS, dissolved oxygen, turbidity, ammonium, chloride, nitrate, salinity, atmospheric pressure, temperature, and more. This comprehensive data collection allows for a thorough assessment of water quality, providing a more complete picture than single-parameter devices. Durable design for harsh environments: Rain or shine, portable water quality meters are strong and capable of testing in various types of weather and terrain. Field technicians need to be ready to test at any moment, whether in cold and stormy mountainous areas or highly humid conditions often found in wetlands and marshes. Portable water quality testing equipment makes on-the-spot analysis possible. Meters are built with tough, rugged components, and most are constructed with waterproof casings that can stand up to the knocks and drops that can occur while testing. Hanna Instruments’ portable multiparameter device comes in a hard casing, making it easy to carry and securely store probes and electrodes. Real-time monitoring: One of the most significant advantages of portable multiparameter devices is their ability to provide real-time data. Immediate feedback on water quality conditions enables quick decision-making and timely interventions. This is particularly crucial in situations where water quality can change rapidly, such as during industrial discharge events or algal blooms. Ease of Use, Accessibility and Mobility: Portable multiparameter devices are designed to be user-friendly, with intuitive interfaces and robust construction that withstands field conditions. This ease of use makes them accessible to a broad range of users, from trained scientists to field technicians. These meters are versatile and can be conveniently carried to various locations, including remote areas, making it easier to test anywhere and obtain immediate results without delays. Cost-Effectiveness: By consolidating multiple testing capabilities into a single device, portable multiparameter testers reduce the need for multiple instruments and associated costs. This cost-effectiveness extends to reduced maintenance and calibration expenses, as fewer devices mean less equipment to service. Enhanced Environmental Protection: Accurate and timely water quality data are crucial for detecting pollution events and monitoring the health of aquatic ecosystems. Portable multiparameter devices help monitor the parameters that impact water quality, aiding in the protection of biodiversity and environmental sustainability. Support for Regulatory Compliance: Accurate and timely water quality data are crucial for detecting pollution events and monitoring the health of aquatic ecosystems. Businesses that monitor water quality to stay in compliance with regulations also depend on this data. Regulatory agencies rely on precise water quality data to enforce environmental laws and standards. Portable multiparameter devices provide the necessary data to ensure compliance with these regulations, helping to maintain safe and clean water for communities and ecosystems. Reducing Environmental Footprint: By enabling more efficient and effective monitoring, portable multiparameter devices can reduce the environmental footprint associated with water quality testing. Fewer trips to and from testing sites, combined with the reduction in equipment needed, contribute to lower carbon emissions and resource use. Start testing with our portable water quality meters We understand! Selecting a portable water quality meter that can meet the demands of field testing can seem overwhelming and daunting. Our collection of portable water quality meters are durable, reliable, and up for the task at hand. There are also various dedicated and multiparameter options to choose from, so finding the right fit for your testing needs is easier than ever. Be prepared to measure water quality parameters including pH, ORP, EC/TDS, dissolved oxygen, turbidity, temperature, and more on-site. Related posts Environmental Monitoring of Nitrates and Other Water Quality Parameters: pH, Environmental Monitoring of Nitrates and Other Water Quality Parameters: pH,… November 22, 2023 Measuring Acidity of Natural Water by Titration Measuring Acidity of Natural Water by Titration In the past… November 22, 2023 Load More Subscribe to our newsletter Latest offers, tips, news, industry insights and resources delivered to your inbox. Email: Name: Subscribe You have been successfully Subscribed! Ops! Something went wrong, please try again.
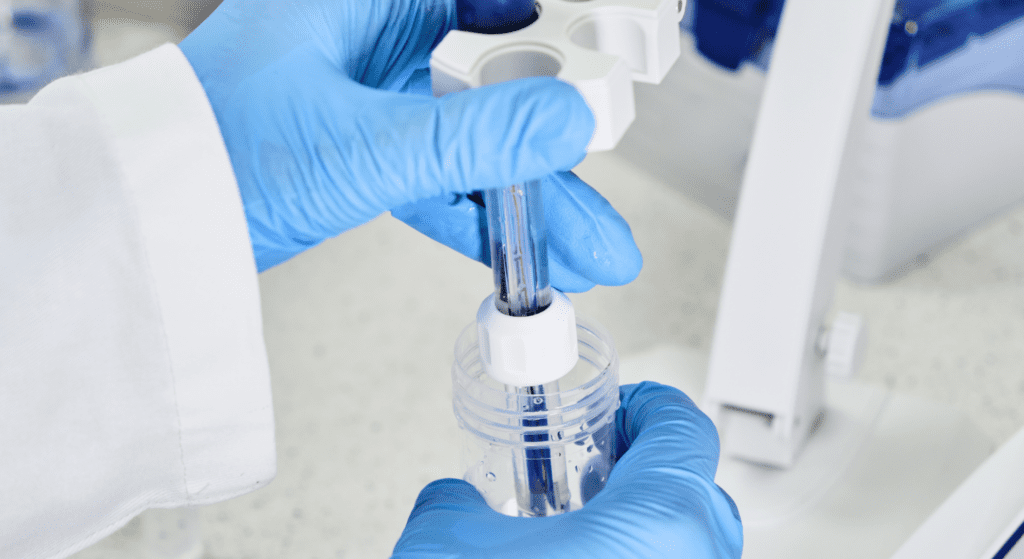
How to Clean a pH Meter Probe Maintaining the accuracy and longevity of your pH meter probe is crucial for obtaining reliable measurements. Regular cleaning of the probe is essential as it can be contaminated by residues from the solutions it measures. Here is a comprehensive guide on how to properly clean a pH meter probe. Why Cleaning is ImportantThe pH meter probe, often called the electrode, is the most sensitive part of the pH meter. It can accumulate residues from the sample solutions, which can affect its accuracy and response time. Regular cleaning ensures that the electrode provides consistent and accurate readings, prolonging the life of the probe. Here are some steps you can take to keep your electrode clean. Materials Needed Distilled or deionized water pH electrode cleaning solution Beaker or container Application-specific cleaning solution (if needed) Mild detergent (optional) Storage solution (optional) Hanna tip for pH probe cleaning Avoid wiping the electrode with a cloth, paper towel, or even a Kim wipe, as this can damage the delicate pH sensing glass. Instead, use application-specific cleaning solutions to clean the electrode. Step-by-Step Cleaning Procedure 1. Rinse with Distilled Water: Start by rinsing the probe with distilled or deionized water to remove any loose particles. Hold the probe under a gentle stream of water or immerse it in a container filled with distilled water. 2. Soak in Cleaning Solution: Soak the electrode in a general cleaning solution or an appropriate use-specific cleaning solution for at least 15 minutes to dissolve contamination. Whenever possible, use a cleaning solution specifically designed for your application, as these are formulated to effectively remove the specific types of stains and deposits from your samples. For example, a cleaning solution for winemaking will effectively remove the deep stains left by red wine and must. Avoid using harsh chemicals or abrasive materials, as they can damage the sensitive glass membrane of the probe. Application specific cleaning: Protein Coating: Soak your electrode in the HI7073L Protein Cleaning Solution for at least 15 minutes to enzymatically dissolve protein deposits. Rinse the electrode with water. Allow it to rehydrate in HI70300L storage solution for at least one hour (overnight for best results). Inorganic Soak: Soak the electrode in HI7074L Inorganic Cleaning Solution for at least 15 minutes to remove precipitates caused by reactions with silver in the filling solution. Rinse the electrode with water. Allow it to rehydrate in HI70300L storage solution for at least one hour (overnight for best results). Oil and Grease: Soak the electrode in HI7077L Oil and Fat Cleaning Solution for at least 15 minutes to remove oil and grease residues without damaging the electrode. Rinse the electrode with water. Allow it to rehydrate in HI70300L storage solution for at least one hour (overnight for best results). 3. Rinse Thoroughly: After cleaning, rinse the pH electrode thoroughly with distilled or deionized (DI) water. Then, soak the electrode in a storage solution for at least 2-3 hours before calibration. For optimal results, we recommend soaking the electrode overnight. This step is crucial to prevent any residual cleaning agent from affecting future measurements. 4. Store the Probe: If you need to store the probe, ensure it is adequately moist according to the manufacturer’s recommendations, usually in a storage solution or buffer. Keep the electrode in a protective cap filled with storage solution. If your probe does not have a cap, use a small container that can hold the probe and enough storage solution to cover the glass bulb. After long-term storage, soak the electrode in storage solution for at least 2-3 hours before use. For best results, soak it overnight to ensure the glass membrane is fully hydrated. 5. Calibration: After cleaning, it’s essential to calibrate the pH meter to ensure accurate readings. Our calibration buffers are designed to have a long shelf life when left unopened. Once opened, a buffer with a pH lower than 7 will last around 4-8 weeks, while a buffer with a pH over 7 will be good for about 1-2 weeks. To prevent contamination of your calibration solutions, never submerge your electrode right into the bottle. Pour out just what is needed into a container that has been rinsed with DI water and use that for your calibration. Never pour used buffer back into the bottle! Read our article about how to calibrate your pH electrode. Maintaining a clean pH meter probe is essential for accurate and reliable measurements. By following these cleaning and maintenance steps, you can ensure the optimal performance of your pH meter. Related posts Environmental Monitoring of Nitrates and Other Water Quality Parameters: pH, Environmental Monitoring of Nitrates and Other Water Quality Parameters: pH,… November 22, 2023 Salt Concentration In A Brine Solution For Curing Salmon Salt Concentration In A Brine Solution For Curing Salmon Traditionally,… November 22, 2023 Load More Subscribe to our newsletter Latest offers, tips, news, industry insights and resources delivered to your inbox. Email: Name: Subscribe You have been successfully Subscribed! Ops! Something went wrong, please try again.

How to Use a pH Meter for Water Testing Maintaining the right pH level in water is crucial for various applications, including agriculture, aquariums, drinking water, and industrial processes. A pH meter is an essential tool for accurately measuring the pH level of water. Here’s a step-by-step guide on how to use a pH meter for water testing. What is a pH Meter? A pH meter is an electronic device used to measure the acidity or alkalinity of a solution. It consists of a probe and a digital display. The probe measures the hydrogen-ion activity in the solution, which the meter then translates into a pH reading. Hanna Instruments manufactures a wide range of pH meters designed for various applications, including portable, benchtop, and multiparameter waterproof pH meters. Step-by-Step Guide to Using a pH Meter 1. Calibrate the pH Meter: Calibration ensures that your pH meter provides accurate readings. It’s important to calibrate the meter regularly, especially before use. Here’s how: Prepare the Calibration Solutions: You will need standard buffer solutions, typically pH 4.0, pH 7.0, and pH 10.0. Turn on the Meter: Press the power button to turn on the pH meter. Rinse the Probe: Rinse the probe with distilled water and gently blot it dry with a lint-free tissue. Immerse the Probe in the pH 7.0 Buffer Solution: Allow the reading to stabilize and adjust the meter to read exactly 7.0. Rinse and Repeat for Other Buffers: Rinse the probe again and repeat the process with the pH 4.0 and pH 10.0 buffer solutions, adjusting the meter as necessary. To learn more, read our article on calibrating pH electrodes. 2. Prepare the Sample: Collect the Water Sample: Use a clean container to collect the water sample you intend to test. Let the Sample Reach Room Temperature: pH readings can be affected by temperature, so it’s best to let the sample reach room temperature for the most accurate measurement. 3. Measure the pH Rinse the Probe: Once again, rinse the probe with distilled water to avoid contamination. Immerse the Probe in the Sample: Place the probe into the water sample. Ensure the probe is fully submerged. Wait for the Reading to Stabilize: Allow a few seconds for the reading to stabilize. The digital display will show the pH level of the water sample. Record the pH Value: Note down the pH value for your records. 4. Clean and Store the Probe Rinse the Probe: After measuring, rinse the probe with distilled water. Store the Probe Properly: If the pH meter will not be used for a while, store the probe in a storage solution to keep it hydrated and ready for future use. Tips for Accurate pH Measurement Regular Calibration: Calibrate your pH meter regularly to maintain accuracy. Proper Storage: Always store the probe in the appropriate storage solution when not in use. Clean the Probe: Rinse the probe with distilled water before and after each use to prevent contamination. Avoid Extreme Temperatures: Extreme temperatures can affect the accuracy of pH measurements, so always test at room temperature. Maintenance tasks beyond cleaning, calibrating, and storage include: Replacing the Membrane: Change the membrane every 2 months, or when it does not read “0.0” in a zero-oxygen solution, or when measurements become unstable. Replacing the Electrolyte: Replace the electrolyte monthly. Tap the cap to ensure no air bubbles remain trapped and avoid touching the membrane. Polishing the Sensor: Whenever you change the membrane, polish the sensor. With the sensor facing down, unscrew the cap counterclockwise. If there are deposits on the sensor, gently brush the surface with the supplied brush, taking care not to damage the plastic body. Do not use the brush on the membrane. If the deposits cannot be removed by brushing, use the supplied abrasive pad to polish the sensor, achieving as much luster as possible for optimal performance. Using a pH meter for water testing is a straightforward process that can provide valuable insights into the quality and condition of your water. By following the steps outlined above and adhering to proper maintenance practices, you can ensure accurate and reliable pH readings. Hanna tips for pH meter maintenance When disassembling the probe and sensors for routine cleaning, it is crucial to inspect the o-ring for any nicks, cracks, or damage that could cause leakage. We offer a complete kit that includes DO electrolyte, DO membranes, a small polishing brush, replacement o-rings, and grease for the sensors. Discover our range of pH meters Order online Related posts Guide to Chemical Oxygen Demand (COD) Testing Guide to Chemical Oxygen Demand (COD) Testing Chemical oxygen demand (COD) is a critical waste treatment measurement in everything from municipal systems… The Complete Guide to Measuring Turbidity in Water The Complete Guide to Measuring Turbidity in Water Turbidity is one of the most common and intuitive qualities of water…. Load More Subscribe to our newsletter Latest offers, tips, news, industry insights and resources delivered to your inbox. Email: Name: Subscribe You have been successfully Subscribed! Ops! Something went wrong, please try again.
Turbidity Meter Calibration: A Step-by-Step Guide Turbidity meters are essential tools for monitoring water quality in various industries, including environmental monitoring, wastewater treatment, food, and beverage. These meters measure turbidity for drinking and surface water. Calibration ensures the accuracy of turbidity measurements, providing reliable data for quality control. Here’s a step-by-step guide on how to calibrate your portable or benchtop turbidity meter effectively. Step 1: Prepare the Equipment Gather all the necessary equipment for calibration: Turbidity calibration standard solutions Cleaning solutions Clean, lint-free cloth Distilled water Calibration cuvettes Gloves Step 2: Clean the Meter Proper cleaning is crucial to remove any residue or contaminants that could affect the accuracy of the measurements. Use a clean, lint-free cloth moistened with cleaning solutions to wipe the optical surfaces of the meter carefully. Step 3: Prepare Calibration Standards Ensure that the calibration standards are within their expiration date and properly mixed before use. Follow the manufacturer’s instructions for dilution if necessary. It is recommended that the turbidity value of the prepared calibration solutions to be close to the default calibration points. Warning: Handle hydrazine sulfate with care because it is a carcinogen reagent. Avoid inhalation, ingestion, or skin contact. Formazin solution can also contain some hydrazine traces. Step 4: Zero Calibration Zero calibration establishes the baseline reading when there is no turbidity in the sample. Place a clean cuvette filled with distilled water into the meter and adjust the instrument to read zero. Step 5: Calibration with Standards Low-Level Calibration: Insert the cuvette containing the low-level turbidity standard into the meter. Allow the reading to stabilize, then adjust the meter to the known turbidity value of the standard. High-Level Calibration: Repeat the process with the high-level turbidity standard. Insert the cuvette containing the high-level standard and adjust the meter to the known value. For best results, the measurement techniques must be followed during calibration. If formazin standards are used, mix the cuvettes gently for about 1 minute and then allow the standard to settle for 1 more minute before calibration. Calibration can be performed in two, three four or five points. Calibration of the turbidity range will not affect the free or total chlorine measurements. Before making the calibration, be sure that you are in the correct range. Step 6: Verification After calibration, it’s essential to verify the accuracy of the measurements. Use a different instrument or test the samples in a laboratory for comparison. If there are discrepancies, recalibrate the turbidity meter and verify again until the readings are consistent. Step 7: Documentation Document the calibration process, including the date, standards used, and any adjustments made. Keep records of calibration for regulatory compliance and quality assurance purposes. Step 8: Routine Maintenance Regular maintenance is the key to keeping your turbidity meter in optimal condition. Clean the instrument after each use and follow the manufacturer’s recommendations for calibration frequency and any other maintenance procedures. Hanna tips for accurate measurement 1. Always put the instrument on a flat, rugged surface when taking measurements. 2. Do not operate in direct sunlight. 3. Keep the lid of the instrument closed when it is not used to prevent dust or dirt from entering inside. 4. Always close the lid of the instrument during measurement. 5. Never use cuvettes with scratches or cracks because they can cause inaccurate readings. Discover our range of Portable and Benchtop Turbidimeters Benchtop Turbidimeters Portable Turbidimeters Order online Order online Related posts Monitoring Water Quality – Disinfection Monitoring Water Quality – Disinfection Part 1. Disinfection Properties of water bodies vary based on natural factors such as landscape… The role of free chlorine in keeping drinking water safe The role of free chlorine in keeping drinking water safe Clean drinking water is essential to human urvival. To make… Load More Subscribe to our newsletter Latest offers, tips, news, industry insights and resources delivered to your inbox. Email: Name: Subscribe You have been successfully Subscribed! Ops! Something went wrong, please try again.

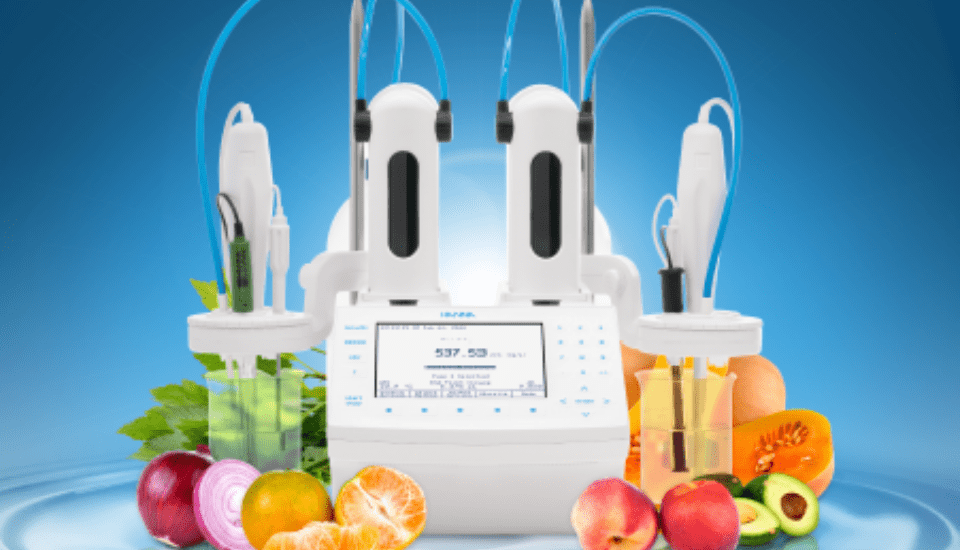
Measuring pH in Acidified Foods Find out all you need to know about measuring pH in acidified foods. To succeed in creating high-quality foods, pH analysis should be at the heart of your strategy. Quantitative analysis needs to be a driving force behind decision-making for food formulations, quality control, and food safety. Analytical testing can easily be integrated into the food production process. From hobbyists to food scientists, many involved in food quality and safety now use a variety of analytical testing techniques to create stable, safe, and most of all, great-tasting foods. Analyzing data is of no use unless the data represents the actual condition of the food. The quality of analytical data depends on proper sampling, appropriate method selection, and effective measurement techniques. This article will discuss how to utilize pH testing to ensure food quality and safety. It will cover how pH affects food quality, as well as the necessary tools and suggested measurement procedures, which will be highlighted for liquid, semisolid, and solid food samples. How does pH affect food quality? pH plays a crucial role in determining the quality of food by influencing its taste, texture, color, and shelf life. Thus, maintaining the appropriate pH level is critical for preserving food quality and safety. Flavor: Organic acids, such as citric acid, can provide a tart or sour flavor to foods. Fermentation: pH affects bacteria used in food production to make cheese, yogurt, vinegar, and soy sauce, to name just a few. Yeast performs best at a pH of 4.5-6.0. Texture: Texture is particularly susceptible to pH changes. Low pH will result in a cheese without shape or hold while high pH causes cheese to crumble. Appearance: pH plays a role in haze formation and contributes to pigment. Anthocyanins, the red pigments found in berries, turn blue, green, or yellow in alkaline conditions. Shelf stability: pH prevents spoilage by inhibiting bacterial growth. Bacteria, such as E.coli, require a pH higher than 4.6 to thrive; anything lower will inhibit growth. How to prepare samples? Preparing food samples for pH testing involves several steps to ensure accurate and reliable results: – Choose representative samples that accurately reflect the composition and characteristics of the food product. Ensure the samples are homogeneous and free from any contaminants. – Direct insertion into liquid samples. – Solids and semisolids should be processed as a paste of uniform consistency. – Oil layers may be discarded to reduce clogging. What do you need to measure pH accurately and efficiently? pH Meter: The pH meter must have a minimum 2-point calibration, automatic temperature compensation, 0.01 pH resolution, and a mV scale pH electrode Calibration solutions: The calibration buffers used should bracket the expected sample pH. Generally, pH 4.01 and 7.01 buffers will bracket most food samples. Cleaning solutions: Contamination on the glass sensing surface and clogged junctions are two of the most common reasons for poor electrode performance. In foods, this is particularly common because fat and protein residues can easily coat the electrode and clog the junction of the pH electrode. Storage solutions: A dry pH electrode can contribute to poor performance. A pH electrode will display one pH value when dry and a different value when hydrated. Every glass pH electrode will form a hydrated layer on the glass. It takes around 3-4 hours for the hydration layer to completely form. A storage solution is designed to keep the electrode bulb hydrated. Storage solutions are also formulated to prevent organic growth which can coat the electrode bulb. Fill solutions: The filling solution of a pH electrode diffuses slowly from the inside of the pH electrode, losing anywhere from 15 – 45 μL/hour (0.33 to 1 drops/hour). The fill solution must be topped off to maintain a proper level. By having these tools and following proper procedures, you can measure pH accurately and efficiently, providing valuable insights into the quality and characteristics of various food samples. An ideal pH meter for testing should have the following characteristics: Accuracy: Provides precise pH measurements within a narrow margin of error, ensuring reliable results. Speed: Offers fast response times, allowing for efficient testing without unnecessary delays. Flexibility: Today’s meters offer a wider range of flexibility. A portable meter offers the ability of in-field use with the performance of a benchtop. Ease of use: Measurement, configuration, calibration, and logging should be easy to do with data management features including direct / USB data transfer. Simple maintenance: Advanced pH meters have diagnostics capability to inform of problems during the calibration process. Diagnostic messages should include the overall probe condition and whether the probe should be cleaned, or if the buffer is contaminated. With these characteristics, an ideal pH meter simplifies the testing process while delivering accurate and reliable pH measurements for various applications. Discover our comprehensive solution tailored to meet measuring pH in acidified foods The HI98161 is a professional portable pH and temperature meter with a probe designed specifically for pH measurement in the food sector. The HI98161 is supplied with all necessary accessories to perform a pH/temperature measurement packaged into a durable thermoformed carrying case that holds the meters, probes and calibration buffers securely in place. Related posts Environmental Monitoring of Nitrates and Other Water Quality Parameters: pH, Environmental Monitoring of Nitrates and Other Water Quality Parameters: pH,… Salt Concentration In A Brine Solution For Curing Salmon Salt Concentration In A Brine Solution For Curing Salmon Traditionally,… Load More Subscribe to our newsletter Latest offers, tips, news, industry insights and resources delivered to your inbox. Email: Name: Subscribe You have been successfully Subscribed! Ops! Something went wrong, please try again.
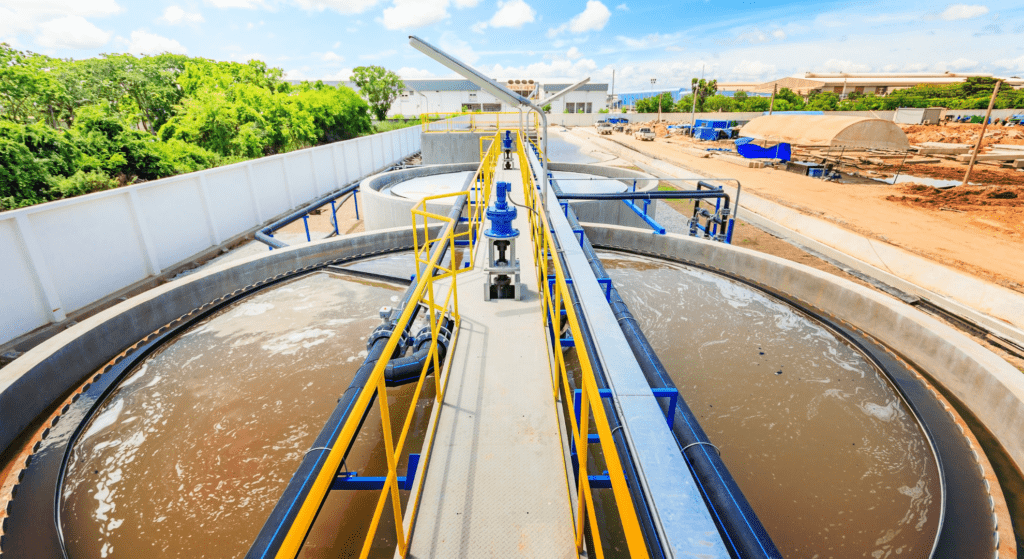
Importance of checking water parameters in wastewater Water parameters in wastewater play a crucial role in ensuring environmental sustainability, community health, and regulatory compliance. Monitoring and analysing wastewater parameters provide valuable insights into the quality of wastewater and its potential impact on environment. Measuring precise parameters in wastewater play pivotal role in water industries. In this article we are highlighting the importance of checking water parameters in wastewater: 1. Environmental impact: Wastewater often contains various pollutants, including metals, nutrients, and organic compounds. Monitoring of water parameters allows the identification of these pollutants, enabling us to implement measures to reduce or eliminate their release. This, in turn, protects and maintains the overall health of water bodies. 2. Community Health: Wastewater can carry harmful contaminants that pose a risk to public health. By checking water parameters, particularly indicators of microbial contamination, we can detect and address potential threats to human health. This is important for preventing the spread of waterborne diseases and ensuring the public safety. 3. Regulatory Compliance: Governments and environmental agencies set water quality standards and regulations to protect natural water bodies and public health. Monitoring of water parameters is essential for industries and wastewater treatment facilities to ensure compliance with these standards. Failure to meet regulatory requirements may result in penalties and legal consequences. 4. Efficient Wastewater Treatment: Understanding the composition of wastewater through the analysis of water parameters is essential for the effective treatment processes. By measuring the amounts of pollutants, treatment plants and water industries can optimize their operations, select appropriate treatment methods, and achieve better overall efficiency in removing contaminants from wastewater before discharge. 5. Resource Conservation: Wastewater may contain valuable resources such as nutrients and energy. Monitoring water parameters allows for the identification of these resources, enabling their recovery and reuse. This not only contributes to sustainability but also reduces the environmental impact. Checking water parameters in wastewater is critical for maintaining environmental health, safeguarding public health, and ensuring sustainable water management practices. This comprehensive monitoring process contributes to a cleaner and safer environment for current and future generations. Our solution to checking water parameters Our Waterproof Multiparameter excels in identifying essential water parameters, including pH, ORP, conductivity, dissolved oxygen, turbidity, ammonium, chloride, nitrate, and temperature. Its robust waterproof design and portability make it the preferred testing tool within the water industry. Related posts Environmental Monitoring of Nitrates and Other Water Quality Parameters: pH, Environmental Monitoring of Nitrates and Other Water Quality Parameters: pH,… Salt Concentration In A Brine Solution For Curing Salmon Salt Concentration In A Brine Solution For Curing Salmon Traditionally,… Load More Subscribe to our newsletter Latest offers, tips, news, industry insights and resources delivered to your inbox. Email: Name: Subscribe You have been successfully Subscribed! Ops! Something went wrong, please try again.
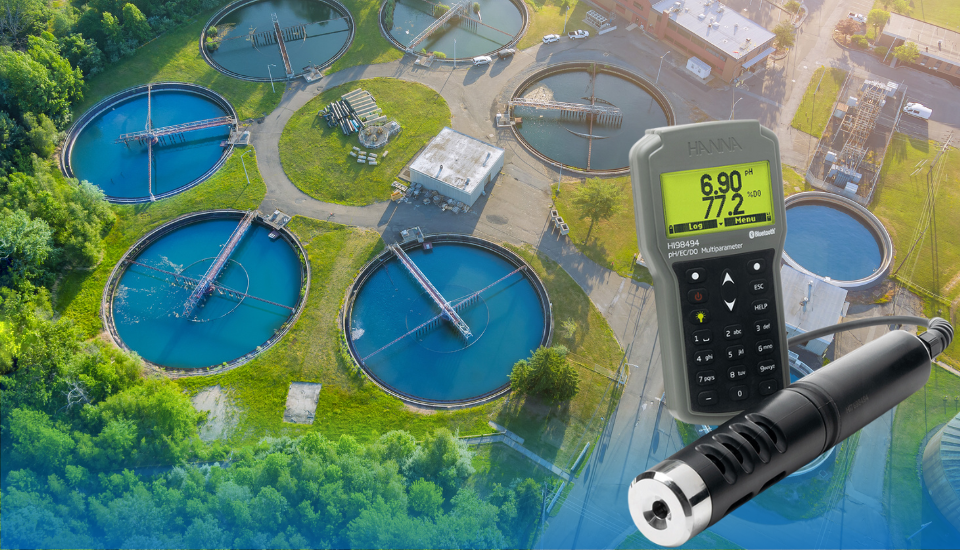
Importance of checking water parameters in wastewater Water parameters in wastewater play a crucial role in ensuring environmental sustainability, community health, and regulatory compliance. Monitoring and analysing wastewater parameters provide valuable insights into the quality of wastewater and its potential impact on environment. Measuring precise parameters in wastewater play pivotal role in water industries. In this article we are highlighting the importance of checking water parameters in wastewater: 1. Environmental impact: Wastewater often contains various pollutants, including metals, nutrients, and organic compounds. Monitoring of water parameters allows the identification of these pollutants, enabling us to implement measures to reduce or eliminate their release. This, in turn, protects and maintains the overall health of water bodies. 2. Community Health: Wastewater can carry harmful contaminants that pose a risk to public health. By checking water parameters, particularly indicators of microbial contamination, we can detect and address potential threats to human health. This is important for preventing the spread of waterborne diseases and ensuring the public safety. 3. Regulatory Compliance: Governments and environmental agencies set water quality standards and regulations to protect natural water bodies and public health. Monitoring of water parameters is essential for industries and wastewater treatment facilities to ensure compliance with these standards. Failure to meet regulatory requirements may result in penalties and legal consequences. 4. Efficient Wastewater Treatment: Understanding the composition of wastewater through the analysis of water parameters is essential for the effective treatment processes. By measuring the amounts of pollutants, treatment plants and water industries can optimize their operations, select appropriate treatment methods, and achieve better overall efficiency in removing contaminants from wastewater before discharge. 5. Resource Conservation: Wastewater may contain valuable resources such as nutrients and energy. Monitoring water parameters allows for the identification of these resources, enabling their recovery and reuse. This not only contributes to sustainability but also reduces the environmental impact. Checking water parameters in wastewater is critical for maintaining environmental health, safeguarding public health, and ensuring sustainable water management practices. This comprehensive monitoring process contributes to a cleaner and safer environment for current and future generations. Our solution to checking water parameters Our Waterproof Multiparameter excels in identifying essential water parameters, including pH, ORP, conductivity, dissolved oxygen, turbidity, ammonium, chloride, nitrate, and temperature. Its robust waterproof design and portability make it the preferred testing tool within the water industry. Related posts Transforming effluent into sustainability: Protecting communities and preserving the environment Transforming effluent into sustainability: Protecting communities and preserving the environment Wastewater treatment plays a pivotal role in preserving the environment… Measuring Dissolved Oxygen in Nanobubbles Measuring Dissolved Oxygen in Nanobubbles Microbubble or nanobubble technology has attracted attention of scientists in recent years. It is an… Load More Subscribe to our newsletter Latest offers, tips, news, industry insights and resources delivered to your inbox. Email: Name: Subscribe You have been successfully Subscribed! Ops! Something went wrong, please try again.
Calibrating your pH electrodes When it comes to pH measurement, precision is crucial. pH meters are indispensable tools in numerous fields, enabling accurate acidity and alkalinity assessments. To ensure reliable and consistent pH readings, regular calibration of pH meters is important because of how the electrode changes over time. The importance of calibration Calibration serves as a fundamental aspect of pH meter maintenance. Over time, pH meters can experience drift due to factors such as electrode aging, temperature fluctuations, or exposure to chemicals. Calibration enables adjustments to be made, aligning the pH meter’s readings with known reference standards. This process ensures accurate and dependable pH measurements, instilling confidence in the results obtained. The Calibration process Preparing the pH electrode First remove the protective cover from the electrode bulb and rinse the bulb in de-ionised (DI) water to remove any salt crystals. After rinsing, remove any excess DI water by shaking down the electrode (do not wipe the sensing tip!). Refill your electrolyte if needed. You’re now ready to calibrate. Note: the formation of salt crystals on your pH electrode is normal. It happens when the storage solution evaporates during shipment or over a long period of unuse. Preparing the calibration solutions Choose two or more calibration solutions with known pH values. These solutions should cover the pH range relevant to the samples being tested. As an example, you could use pH buffers 1.00 and 4.01 for a two-point calibration to measure the pH of lemon juice (which has a pH around 2). Remember to always use fresh solutions and replace them if they become contaminated. Maintaining pH Calibration Solutions Never submerge your electrode right into the calibration solution bottle. Pour out just what is needed into a container that has been rinsed with DI water and use that for your calibration. Discard used calibration solutions. Hanna calibration buffers are designed to have a long shelf life when left unopened. Once opened, a buffer with a pH lower than 7 will last around 4-8 weeks, while a buffer with a pH over 7 will be good for about 1-2 weeks. For even better accuracy, you can perform a third calibration at pH 7.01. Calibrating at pH 7.01 can determine problems such as a contaminated or broken probe and helps avoid any errors in measurement. It’s best to calibrate daily for high accuracy. However, calibrating once or twice a week is fine too if you don’t require highly accurate measurements. If you decide to do the latter, we recommend using the single-use sachets, instead of the bottle. Shelf-life is limited after bottles are opened, whilst the sachets can last longer. Performing pH meter calibration Start by rinsing the electrode in DI water and stir the electrode gently for 4-6 seconds. Then place the electrode in your first calibration solution, carefully submerged the sensing tip and junction and stir gently. If you use magnetic stirrer, ensure that vortex is not forming. Wait for the reading to stabilize for at least 3 seconds and confirm the calibration. Repeat this process as needed for your other calibration solutions. Now you’re ready to take your measurements and be confident in their accuracy. Optional: Check your Good Laboratory Practice (GLP) Data Many Hanna meters have a GLP data screen that allows you to verify that the electrode’s calibration data is acceptable for use in measurement. This data includes the slope and offset of the electrode (the Nernst equation) The slope should be between 85-105% (51-62 mV/pH unit) and the offset should be between ±30mV. If your electrode is outside of this range, try cleaning, reconditioning and calibrating with fresh buffer. If the problem persists, you may need to replace your electrode. Using storage solutions If your electrode is dry, rehydrate the sensing tip by soaking the bulb and junction in an electrode storage solution for at least one hour or more. Storing your electrode in storage solution also improves its life span and performance. Storing your pH electrode in storage solution rather than water is important for reducing microbial growth, preventing the reference electrolyte from leaching out, and keeping the junction clear. If you’re out of storage solution, pH 4 or 7 buffers can be used in a pinch. Cleaning and storing your pH electrode Soak the electrode in a general cleaning solution, or an appropriate use-specific cleaning solution, for at least 15 minutes before calibration to dissolve contamination. Never store pH electrodes in distilled or deionized water. Doing so will shorten the life of the sensor. When possible, we strongly suggest using a cleaning solution specially designed for what you are testing. Each dedicated cleaning solution is made to effectively remove the specific types of stains and deposits from your sample. (For example, the cleaning solution for soil tester will remove the dirt and organic matters that can get stuck on the electrodes.) After cleaning, rinse the pH electrode thoroughly with distilled or DI water, and then soak the electrode in storage solution for at least 2-3 hours before calibration. We recommend soaking the electrode overnight for best results. Get your complete set of solutions from Hanna Instruments Australia. (What’s included: pH 4.01, 7.01 and 10.01 technical calibration solutions, storage solution and cleaning solution). Related posts Environmental Monitoring of Nitrates and Other Water Quality Parameters: pH, Environmental Monitoring of Nitrates and Other Water Quality Parameters: pH,… Salt Concentration In A Brine Solution For Curing Salmon Salt Concentration In A Brine Solution For Curing Salmon Traditionally,… Load More Subscribe to our newsletter Latest offers, tips, news, industry insights and resources delivered to your inbox. Email: Name: Subscribe You have been successfully Subscribed! Ops! Something went wrong, please try again.
Transforming effluent into sustainability: Protecting communities and preserving the environment Wastewater treatment plays a pivotal role in preserving the environment and safeguarding public health. As industrial and population growth continue to increase the volume of wastewater generated, effective treatment methods are crucial to mitigate environmental impact. We will explore the importance of wastewater treatment, its significance in public health and the various methods employed to treat wastewater. Wastewater, generated from residential, commercial, industrial and agricultural activities contains a wide range of contaminants. If left untreated, it can pose significant health risks to the public and the environment. Proper wastewater treatment is essential for several reasons: Why wastewater treatment matters Public health Wastewater often contains harmful pathogens, bacteria and viruses that can cause waterborne diseases. By treating wastewater, these pathogens are removed, preventing the spread of illnesses and protecting public health. Environmental protection Untreated wastewater discharged into water bodies can lead to water pollution, harming aquatic ecosystems and compromising the biodiversity of rivers, lakes and oceans. Effective treatment processes remove pollutants, minimising the environmental impact and maintaining ecological balance. Resource conservation Wastewater contains valuable resources such as water, energy and nutrients. Treating and recycling wastewater allows for the conservation of these resources, reducing the strain on freshwater supplies and promoting sustainable practices. Wastewater Treatment Methods Wastewater treatment involves several stages to ensure its safe disposal or reuse: Preliminary Treatment The initial stage involves the removal of large objects and debris through screening and sedimentation. This process prevents damage to downstream equipment and ensures the smooth flow of wastewater. Primary Treatment In this phase, physical processes such as sedimentation and flotation are employed to remove suspended solids and organic matter. Gravity settles the solid particles, forming sludge, while the relatively clear liquid proceeds to secondary treatment. Secondary Treatment Also known as biological treatment, this stage uses biological processes to further break down organic matter. Aerobic and anaerobic processes, such as activated sludge, trickling filters, and lagoons, facilitate the decomposition of organic substances, converting them into harmless byproducts. Tertiary Treatment If higher water quality standards are required, tertiary treatment is employed. This phase uses advanced filtration technologies like sand filters, membranes, or chemical processes such as coagulation and disinfection to remove remaining suspended solids, nutrients, and pathogens. Sludge Treatment Sludge produced during the treatment process undergoes separate treatment. Techniques such as digestion, dewatering, and drying are employed to reduce the volume and stabilize the sludge, facilitating safe disposal or beneficial reuse. Advanced Wastewater Treatment Technologies As technology advances, innovative approaches are being utilized to improve wastewater treatment efficiency and resource recovery. Some notable advancements include: Membrane Filtration Membrane-based technologies, including microfiltration, ultrafiltration, nanofiltration, and reverse osmosis, offer enhanced filtration and separation capabilities, effectively removing particles, microorganisms, and dissolved contaminants. Biological Nutrient Removal (BNR) BNR processes combine nitrogen and phosphorus removal with traditional biological treatment. These processes optimize nutrient removal, minimizing the discharge of these pollutants into water bodies and reducing the risk of eutrophication. Resource Recovery Advanced treatment techniques allow for the recovery of resources from wastewater. These include the extraction of energy through anaerobic digestion or the recovery of nutrients like phosphorus and nitrogen for use as fertilisers. Wastewater treatment is a crucial process that protects public health, preserves the environment, and promotes sustainability. By effectively treating and managing wastewater, we can prevent waterborne diseases, minimize water pollution, and conserve At Hanna Instruments, we can supply you with reliable equipment for effective wastewater treatment: BlackStone Series dosing pumps use a minimum number of moving parts, therefore reducing the chance of mechanical failure. Part wear and oiling associated with motor driven pumps (ball-bearings, gear drives and cams) are not a concern with these pumps. A wide range of BlackStone pumps with different dosing capacities are available for your specific dosing needs The pumps have been designed to meet the ever changing needs of the industry. HI9829 waterproof multiparameter is a portable logging multiparameter tool that monitors up to 14 different water quality parameters. The microprocessor based multi-sensor probe allows for the measurement of key parameters including pH, ORP, conductivity, dissolved oxygen, turbidity, ammonium, chloride, nitrate and temperature. Related posts Environmental Monitoring of Nitrates and Other Water Quality Parameters: pH, Environmental Monitoring of Nitrates and Other Water Quality Parameters: pH,… Salt Concentration In A Brine Solution For Curing Salmon Salt Concentration In A Brine Solution For Curing Salmon Traditionally,… Load More Subscribe to our newsletter Latest offers, tips, news, industry insights and resources delivered to your inbox. Email: Name: Subscribe You have been successfully Subscribed! Ops! Something went wrong, please try again.


